
Galleries are best viewed with a resolution of 1024x768 pixels. All images copyright © All rights reserved
Website & Database |
||
IntroductionSince starting photography in the 1970's I've accumulated nearly 500 sheets of 35mm and 120 size negatives and transparencies. Most 35mm sheets contain 36 frames, 120 sheets contain 15 frames. The sheets are filed in a set of ring binders. I've never actually counted but there must be something between 10,000 and 15,000 photographs in total. Only a relatively small number of the images have been selected for printing or digital scanning. A few years ago I decided to create a website to display some of my photographs and paintings. I initially spent some time creating a simple site from scratch using raw html (Frontpage and Dreamweaver are for wimps!). When I started trying to identify and date images and negatives for the website, I realised I needed to catalogue the details in some sort of database. Unfortunately my photographic record keeping in the early days was not very thorough. Quite a few early negative sheets don't even include date information. As the number of images on the website increased, I found it was taking a long time to manually edit the associated html pages and that a lot of it was repetitive cut and paste. I decided to automate as much of the process as possible. This meant automatically generating the html using information extracted from the database. Database requirementsI considered creating a full-blown dynamic system using SQL and PHP. This could have been designed to allow prints and paintings to be purchased online or for high resolution versions of photographs to be bought and downloaded. However the website was not really intended as a commercial venture. Not only would that have been a lot of work, but the free ISP I was using at the time did not support server side scripting. The cheap alternative was to create the html pages statically and upload them to the website using FTP. I decided to make use of Microsoft Access since I already had Office 2003. (Now I have broadband and an ISP that provides server side scripting and SQL, I may eventually replace the static scheme with a dynamic one using ASP.NET). The database needed to hold the details for three different kinds of image:-
I also wanted to be able to automatically surround the images on the website with coloured matts and picture frames. The database would need to hold the information about the frames and matts. Another useful facility is to be able to classify images and carry out searches based upon a set of keywords or tags. For example, a photo of a steam engine could be classified under keywords such as 'engine', 'transport', 'nostalgia', 'history', 'industrial'. It could also include tags representing location such as 'didcot' or 'festiniog'. The tricky part is deciding on the set of keywords. The use of a thesaurus within the search would make it easier to match similar keywords. This becomes more useful as the number of images becomes large. Although I've made some provision for this feature, it's not yet been implemented. It would also be useful to allow searches with logical combinations of more than one keyword tag. For example, find all images that contain the keywords 'train' or 'locomotive'. This would almost certainly require server side scripting. There are a host of additional features that server side scripting would allow. The main problem is the amount of work involved in writing the software. If too much work is required, then it would be easier just to use free photo gallery websites such as flickr or picasa. Here are just a few ideas...
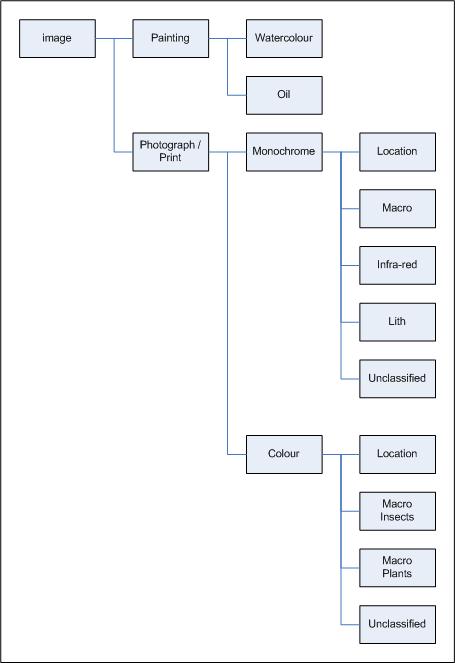
The ability to print labels to stick on negative sheets is another useful feature. TaxonomyClassification of images for display in a gallery is tricky. I don't know if there is an optimum scheme. Do you classify by geographical location or subject e.g. landscape/people/plants/animals. Should you have separate classes for things like macro images and infra-red? What about colour / monochrome? If I have two landscapes, one colour and one monochrome should they both appear in the same gallery page for that location? Do you make a distinction between photographs (scanned negatives or transparencies) and scanned prints such as lith? I didn't want to have too many images in any one web gallery page otherwise there would be too many thumbnails to download. Currently I have a classification structure something like this:-
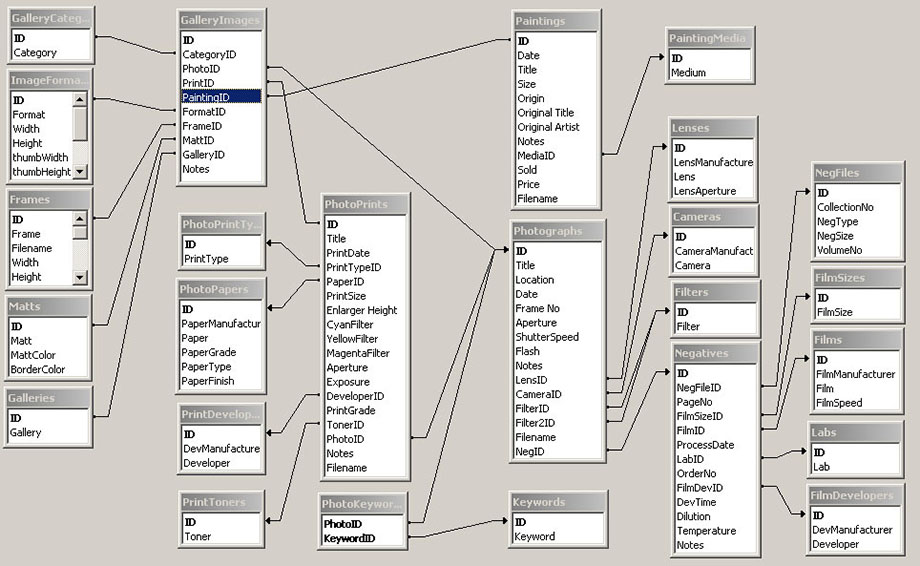
In the diagram, the boxes labelled 'Location' represent a set of galleries - one for each geographical area. Currently, gallery navigation is linear to keep things simple. There are no sub-galleries or folders. Database implementationThe Access database includes information for each negative sheet such as processing date, film size and type. The database includes film processing details and the ring binder volume and page number. For films developed at home it includes details of the chemistry used, dilution, temperature etc. The same database holds the information for scanned images, prints and paintings - some of which appear in the galleries on this web site. Initially I did not include a field to hold the time when the photograph was shot. This was mainly because when shooting film, the exact time was often unknown. However, I soon realised that in some cases, the sequence in which images appear in a gallery can sometimes be important. A time field is needed to allow images to be sorted in the order in which they were shot. Most digital cameras include the time as part of the image metadata, so this information is now readily available. For scanned negatives and transparencies it holds negative and frame id numbers, date, location, lens, filter(s) used, and where available, shutter speed and lens aperture. For scanned silver prints, the database includes print date, paper type and size, paper developer used, filters used during printing, enlarger height, aperture and exposure time and toning details. The database tables and relationships between them are fairly complex as shown below.
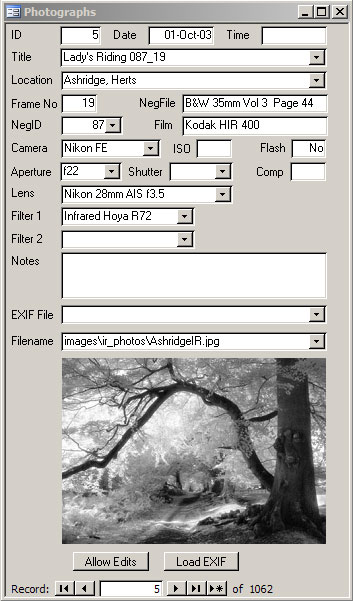
Getting the tables and relationships right was tricky - I had no previous experience in database construction. For example, I originally decided to place the cameraID in the Photographs table. That means I have to select the camera as well as the negative sheet ID when I fill in an entry form for a photograph. I could have placed the cameraID in the Negatives table on the basis that the same camera is normally used to take every photograph on a particular negative sheet. That would mean selecting a negative sheet for an image would automatically bring up the associated camera details. It is possible to rewind a film before it has reached end of roll and reload it into a different camera so that some frames on a roll are from one camera while others are from another. This could be handled by treating each subset as a separate negative sheet ID. However, placing the CameraID in the Negatives table would not work for images from digital cameras where there are obviously no negatives. In the end I decided the best compromise is to include a CameraID entry in both Photographs and Negatives tables. That way the camera used can be entered when the negative details are filled in on the Negatives form. When the NegativeID is subsequently entered in the Photographs form, the CameraID from Negatives table is set as the initial default. This can be overridden if required to allow for mid-roll camera/film changes or other unusual situations. For images from a digital camera, the NegativeID field is left blank, so the camera must be chosen when the Photographs form is filled in. Note that this is a recent change, so the CameraID field is not shown in the Negatives table in the relationships diagram above. Database entry formsI created a set of customised Microsoft Access Forms to simplify data entry. The examples below show the forms for entering photo and print details.
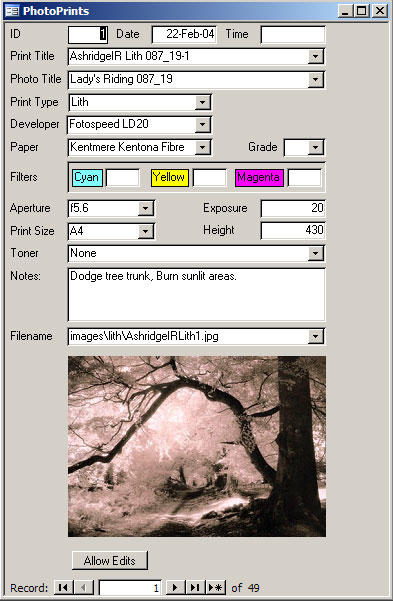
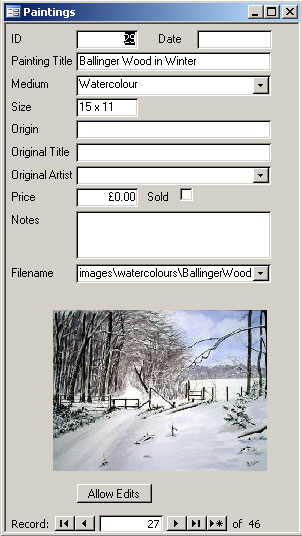
Print details include the id of the original negative or transparency. The database tables are constructed such that it can hold separate details for different prints made from the same negative. There is a similar form for entering painting details.
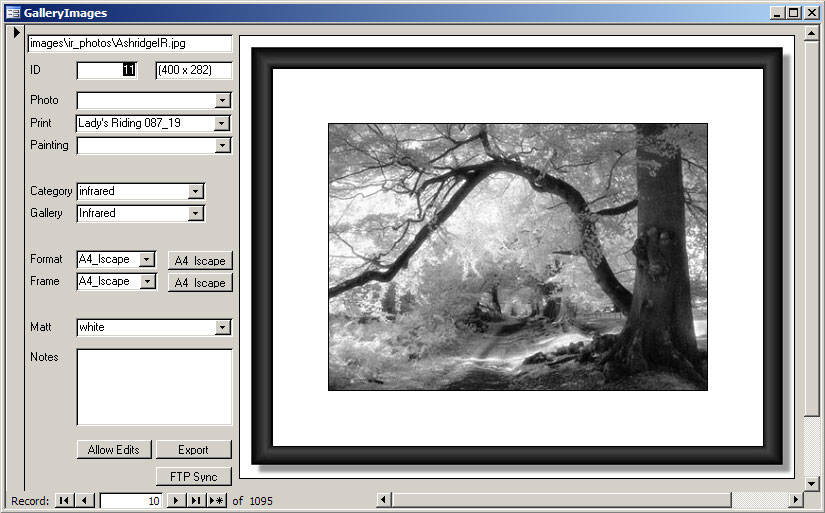
Once the photo/print/painting details have been entered, the 'Gallery' form can be used to select which galleries the images should appear in. This form is also used to choose the matt and frame. The Gallery form contains a button to export the database (which creates the html files for the website). Another button launches an FTP synchronisation utility to copy any new or changed files to the remote site.
Exif dataWith film, database information such as camera and lens settings, date and time etc. has to be entered manually for each photograph. When there are many images to process, entering this data can be time consuming and error prone. With digital cameras, most of the camera settings are available in the EXIF data contained within the original RAW or JPEG file. There are a number of free software tools to read this information such as 'exiftool'. I have now incorporated this feature into my MS Access database application using some Visual Basic code. It means I can now automatically populate the required fields on selecting the original image file (NEF, JPG etc) containing the EXIF data. Image resolutionScanned images for the website are kept fairly small and low resolution. This is partly due to the space available on the browser window for a typical 1024 x 768 pixel monitor. It also reduces the amount of disk space used and keeps the internet data transfer times reasonable. In addition prevents high resolution versions of the images from being downloaded and used without permission. I have standardised on a limited number of different aspect ratios for scanned images and the associated thumbnails. This makes it easier to add the picture frames in the galleries.
The size restrictions only apply to images that are to have frames automatically added. Some of the images have frames already included as part of the image jpg file. This is usually the case for paintings where the standard thin black frame I use for photographs may not be suitable. For these images, I specify the image height only. I allow the browser to determine the width from the size of the image file. This allows it to cope with any aspect ratio. Picture framesIn some cases I add picture fames manually to an image using PaintShop Pro. I normally only do this for paintings where I want a different frame type to my standard black photo frame (e.g. gold). Adding a frame manually is also required for images with a non-standard aspect ratio. It also means creating the frame drop shadow by hand. Usually I add the frames automatically. The black picture frames are separate jpeg images created using Paintshop Pro. They are surrounded by a white border containing a drop shadow. There are separate picture frame images for each of the standard aspect ratios in the table - A large one used for the main image and a small one for the thumbnail. Creating these images is not as straightforward as you may imagine. You cannot simply stretch the entire picture frame image in photoshop for each aspect ratio. That would result in different widths for the horizontal and vertical sections of the frame. It was necessary to chop the image into the vertical and horizontal components, resize each one and then rejoin them to form a rectangular frame. Below is the picture frame for a landscape aspect ratio image thumbnail:-
The actual image is positioned in the centre of the picture frame leaving an even gap on all sides for the matt and a thin border line. Matts and bordersI can choose the colour of the matt and border line separately for each image. I can either select a named colour scheme already stored in the database or create and save a new scheme using slider controls on the input form.
This form uses some Visual Basic to allow me to choose between RGB and HSL slider controls. It is normally easier to make the adjustments using HSL (Hue, Saturation, Luminance). The form allows me to view any image I want in the center of the matt to help choose the colours. The selected colours eventually appear in the html page associated with each image. Gallery html pagesThe html pages for the web gallery are generated automatically from the database by clicking a button on one of the data entry forms. The information from an Access database Query is exported as a text file to a program called 'Gallery'. The text file contains a set of records - one for each image that will appear in the gallery. Each record contains a list of comma separated values from the database. The database query allows the records to be pre-sorted. I sort the image records by category, gallery, date and time. The Gallery program is written in 'C'. It creates the html pages based upon template files. Delimited token strings in the template files are replaced with information extracted from the database records. The resulting html pages together with the associated jpeg image files and thumbnails are then uploaded to the website using FTP. ThumbnailsOriginally I created the thumbnail images manually: After scanning, retouching and resizing the main image in photoshop, I would save a small resized copy. I have recently enhanced the Gallery program to create the thumbnails automatically. This uses the open source Image Magick software suite to do the resizing and jpg encoding/decoding. The Gallery program automatically creates a new thumbnail if one does not already exist or updates an existing file if the modification date of the main image is later. The Gallery program maintains a log file that records each thumbnail file that is updated. Before I added an automated FTP synchronisation facility, this made it easier to identify which files needed to be uploaded to the website. FTP Website SynchronisationIn the original design, all the html files were re-created each time the database was exported. Hence, all the file modification dates were updated irrespective of whether or not the file content had changed. This made it difficult to identify which files needed to be uploaded to the website using FTP. The log file mentioned above listed any new thumbnail files but that did not help when it came to identifying changes to existing jpg or html files. The problem has been solved by first creating temporary html files when the database is exported. Any existing files are only replaced if they differ from the corresponding temporary file. The file modification date for existing files thus remains unchanged. The FTP client I use is WS_FTP. This has a very useful synchronisation utility that can be configured to automatically upload only those files with a modification date later than any existing files on the remote site. It can be configured with a list of files or folders to be ignored. The items in the list can include wildcards. The utility makes it easy to automatically keep the remote files in sync while minimising the number of FTP transfers. The FTP Synchronisation utility has been integrated into the Access database application and can be launched via a button on one of the forms. Photo Gallery image title numbering.For my own ease of reference, photograph and print titles for images in the gallery that are derived from film based media include an id number of the form 'xxx_yy'. 'xxx' is the negative (or transparency) sheet id, 'yy' is the frame id (normally 01 up to 36). To keep titles unique, an additional number may be appended in cases where multiple images are derived from the same frame. The numbering system does not apply for images from digital cameras. For digital, I initially simply appended the incrementing filename number provided by the camera to the title string. However, this number is only unique for a given flash memory card, so there is a danger that eventually there will be a duplicate title and/or image filename. This is not allowed in the database. Hence I now apply an incrementing serial number prefix for each batch of images from a given memory card that I upload. Digital image titles (and image filenames) are of the form <title>_xxx_yyyy. 'xxx' is the upload batch number (unique for a given flash card), 'yyyy' is the frame number derived from the filename supplied by camera. This will ensure that all titles and filenames will always be unique. Negative sheet labelsUsing Queries and Reports, Microsoft Access can automatically create and print labels. I use this to create small labels that I stick onto each negative sheet in the archive. The labels give basic information such as the sheet ID, volume and page number, process date, film type, developer etc. If I need more detailed information then I can search the database using the sheet ID number. |
||||||||||||||||||||||||||


|
||||||||